Upgrading to a New NetBox Release
Upgrading NetBox to a new version is pretty simple, however users are cautioned to always review the release notes and save a backup of their current deployment prior to beginning an upgrade.
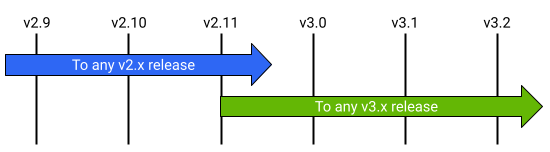
NetBox can generally be upgraded directly to any newer release with no interim steps, with the one exception being incrementing major versions. This can be done only from the most recent minor release of the major version. For example, NetBox v2.11.8 can be upgraded to version 3.3.2 following the steps below. However, a deployment of NetBox v2.10.10 or earlier must first be upgraded to any v2.11 release, and then to any v3.x release. (This is to accommodate the consolidation of database schema migrations effected by a major version change).
Perform a Backup
Always be sure to save a backup of your current NetBox deployment prior to starting the upgrade process.
1. Review the Release Notes
Prior to upgrading your NetBox instance, be sure to carefully review all release notes that have been published since your current version was released. Although the upgrade process typically does not involve additional work, certain releases may introduce breaking or backward-incompatible changes. These are called out in the release notes under the release in which the change went into effect.
2. Update Dependencies to Required Versions
NetBox requires the following dependencies:
| Dependency | Minimum Version |
|---|---|
| Python | 3.8 |
| PostgreSQL | 12 |
| Redis | 4.0 |
3. Install the Latest Release
As with the initial installation, you can upgrade NetBox by either downloading the latest release package or by cloning the master branch of the git repository.
Warning
Use the same method as you used to install NetBox originally
If you are not sure how NetBox was installed originally, check with this command:
ls -ld /opt/netbox /opt/netbox/.git
If NetBox was installed from a release package, then /opt/netbox will be a
symlink pointing to the current version, and /opt/netbox/.git will not
exist. If it was installed from git, then /opt/netbox and
/opt/netbox/.git will both exist as normal directories.
Option A: Download a Release
Download the latest stable release from GitHub as a tarball or ZIP archive. Extract it to your desired path. In this example, we'll use /opt/netbox.
Download and extract the latest version:
# Set $NEWVER to the NetBox version being installed
NEWVER=3.5.0
wget https://github.com/netbox-community/netbox/archive/v$NEWVER.tar.gz
sudo tar -xzf v$NEWVER.tar.gz -C /opt
sudo ln -sfn /opt/netbox-$NEWVER/ /opt/netbox
Copy local_requirements.txt, configuration.py, and ldap_config.py (if present) from the current installation to the new version:
# Set $OLDVER to the NetBox version currently installed
OLDVER=3.4.9
sudo cp /opt/netbox-$OLDVER/local_requirements.txt /opt/netbox/
sudo cp /opt/netbox-$OLDVER/netbox/netbox/configuration.py /opt/netbox/netbox/netbox/
sudo cp /opt/netbox-$OLDVER/netbox/netbox/ldap_config.py /opt/netbox/netbox/netbox/
Be sure to replicate your uploaded media as well. (The exact action necessary will depend on where you choose to store your media, but in general moving or copying the media directory will suffice.)
sudo cp -pr /opt/netbox-$OLDVER/netbox/media/ /opt/netbox/netbox/
Also make sure to copy or link any custom scripts and reports that you've made. Note that if these are stored outside the project root, you will not need to copy them. (Check the SCRIPTS_ROOT and REPORTS_ROOT parameters in the configuration file above if you're unsure.)
sudo cp -r /opt/netbox-$OLDVER/netbox/scripts /opt/netbox/netbox/
sudo cp -r /opt/netbox-$OLDVER/netbox/reports /opt/netbox/netbox/
If you followed the original installation guide to set up gunicorn, be sure to copy its configuration as well:
sudo cp /opt/netbox-$OLDVER/gunicorn.py /opt/netbox/
Option B: Clone the Git Repository
This guide assumes that NetBox is installed at /opt/netbox. Pull down the most recent iteration of the master branch:
cd /opt/netbox
sudo git checkout master
sudo git pull origin master
Checking out an older release
If you need to upgrade to an older version rather than the current stable release, you can check out any valid git tag, each of which represents a release. For example, to checkout the code for NetBox v2.11.11, do:
sudo git checkout v2.11.11
4. Run the Upgrade Script
Once the new code is in place, verify that any optional Python packages required by your deployment (e.g. django-auth-ldap) are listed in local_requirements.txt. Then, run the upgrade script:
sudo ./upgrade.sh
Warning
If the default version of Python is not at least 3.8, you'll need to pass the path to a supported Python version as an environment variable when calling the upgrade script. For example:
sudo PYTHON=/usr/bin/python3.8 ./upgrade.sh
This script performs the following actions:
- Destroys and rebuilds the Python virtual environment
- Installs all required Python packages (listed in
requirements.txt) - Installs any additional packages from
local_requirements.txt - Applies any database migrations that were included in the release
- Builds the documentation locally (for offline use)
- Collects all static files to be served by the HTTP service
- Deletes stale content types from the database
- Deletes all expired user sessions from the database
Note
If the upgrade script prompts a warning about unreflected database migrations, this indicates that some change has been made to your local codebase and should be investigated. Never attempt to create new migrations unless you are intentionally modifying the database schema.
5. Restart the NetBox Services
Warning
If you are upgrading from an installation that does not use a Python virtual environment (any release prior to v2.7.9), you'll need to update the systemd service files to reference the new Python and gunicorn executables before restarting the services. These are located in /opt/netbox/venv/bin/. See the example service files in /opt/netbox/contrib/ for reference.
Finally, restart the gunicorn and RQ services:
sudo systemctl restart netbox netbox-rq
6. Verify Housekeeping Scheduling
If upgrading from a release prior to NetBox v3.0, check that a cron task (or similar scheduled process) has been configured to run NetBox's nightly housekeeping command. A shell script which invokes this command is included at contrib/netbox-housekeeping.sh. It can be linked from your system's daily cron task directory, or included within the crontab directly. (If NetBox has been installed in a nonstandard path, be sure to update the system paths within this script first.)
sudo ln -s /opt/netbox/contrib/netbox-housekeeping.sh /etc/cron.daily/netbox-housekeeping
See the housekeeping documentation for further details.